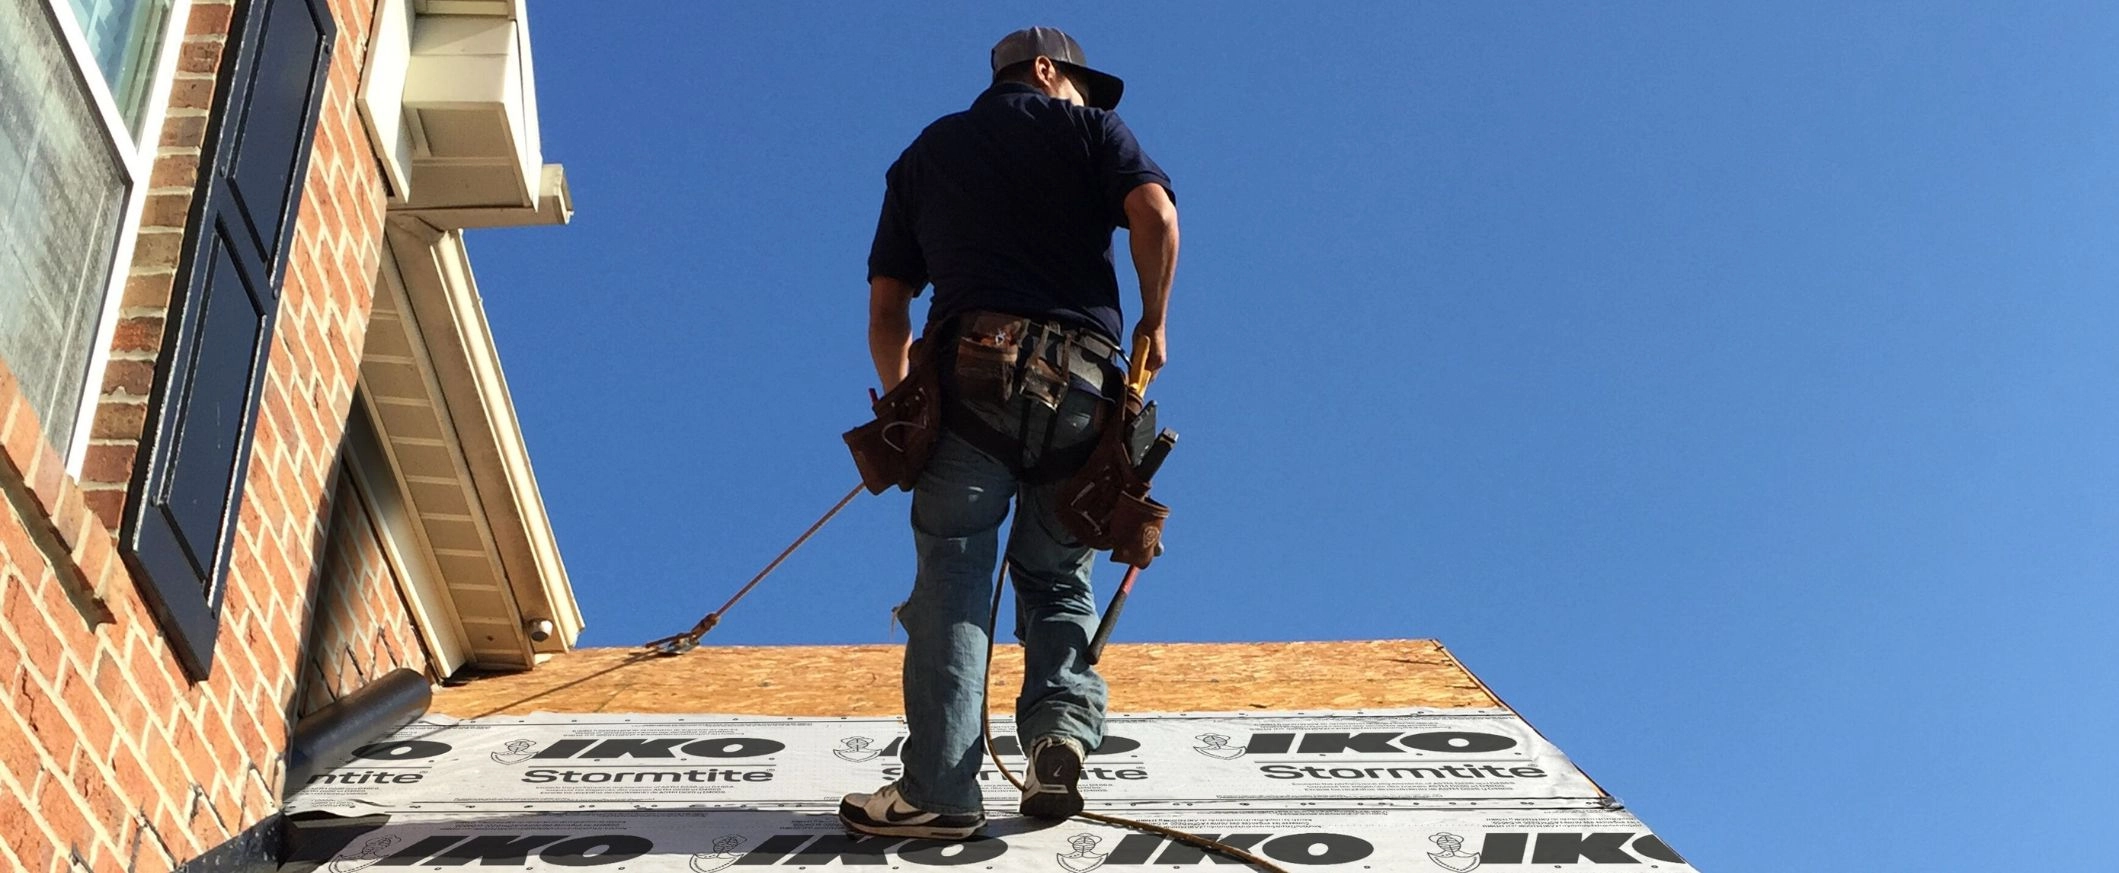
Roof planes that butt up against vertical walls at the end of each new shingle course need to be protected by installing metal step flashing. Metal step flashing pieces are rectangular, approximately 10 inches long and at least 2 inches wider than the face of the shingle being used. For instance, when using metal flashing pieces with IKO Advantage Size Laminated Shingles, which have a 5 7/8-inch exposure, the size of the flashing will typically be 10 x 8 inches. Other sizes are acceptable for local code allowances, so be sure to check yours. The 10-inch length is bent in half so that 5 inches will reach up the wall surface and the other 5 inches will extend onto the roof deck. Place a piece of step flashing on top of the first row of shingles that butts up against a vertical wall or structure. Embed each step flashing piece in a 3-inch-wide application of asphalt plastic cement and nail to the roof deck with two nails. Do not nail the flashing pieces to the vertical wall. This will allow the flashing pieces to move with any differential expansion and contraction that may occur between the roof deck and the wall. As you make your way up the roof, ensure that you position the metal flashing piece in each core so that the overlaying shingle will cover it completely. The end of the shingle in each course, if installed with the correct shingle exposure, will overlap and conceal the step flashing. The end of each shingle adjacent to the wall must also be embedded in a 3-inch-wide application of asphalt plastic cement. Flashing pieces and shingles in each course are installed on asphalt cement and nailed accordingly in succeeding alternating overlapping steps up the roof. Flashing laps should never buck or obstruct the flow of water. Chimney flashings are secured to the roof cover of the shingles and counter or cap flashings are secured to the chimney, providing a waterproof seal. For pipe flashings around soil stacks, shingle up to the bottom of the stack, then slide the new flashing over the soil pipe and into place. Nails for securing the flashings to the roof should be used sparingly, where the flashing manufacturer recommends, and not be driven close to the pipe. Continue shingling, cutting to fit around the stack. Each cut shingle should be laid in a bead of asphalt plastic cement. We recommend putting a dab of asphalt plastic cement over the exposed nails to seal against leaks. Great job! By flashing vulnerable areas of the roof, you are helping prevent water infiltration.
Table of Contents:
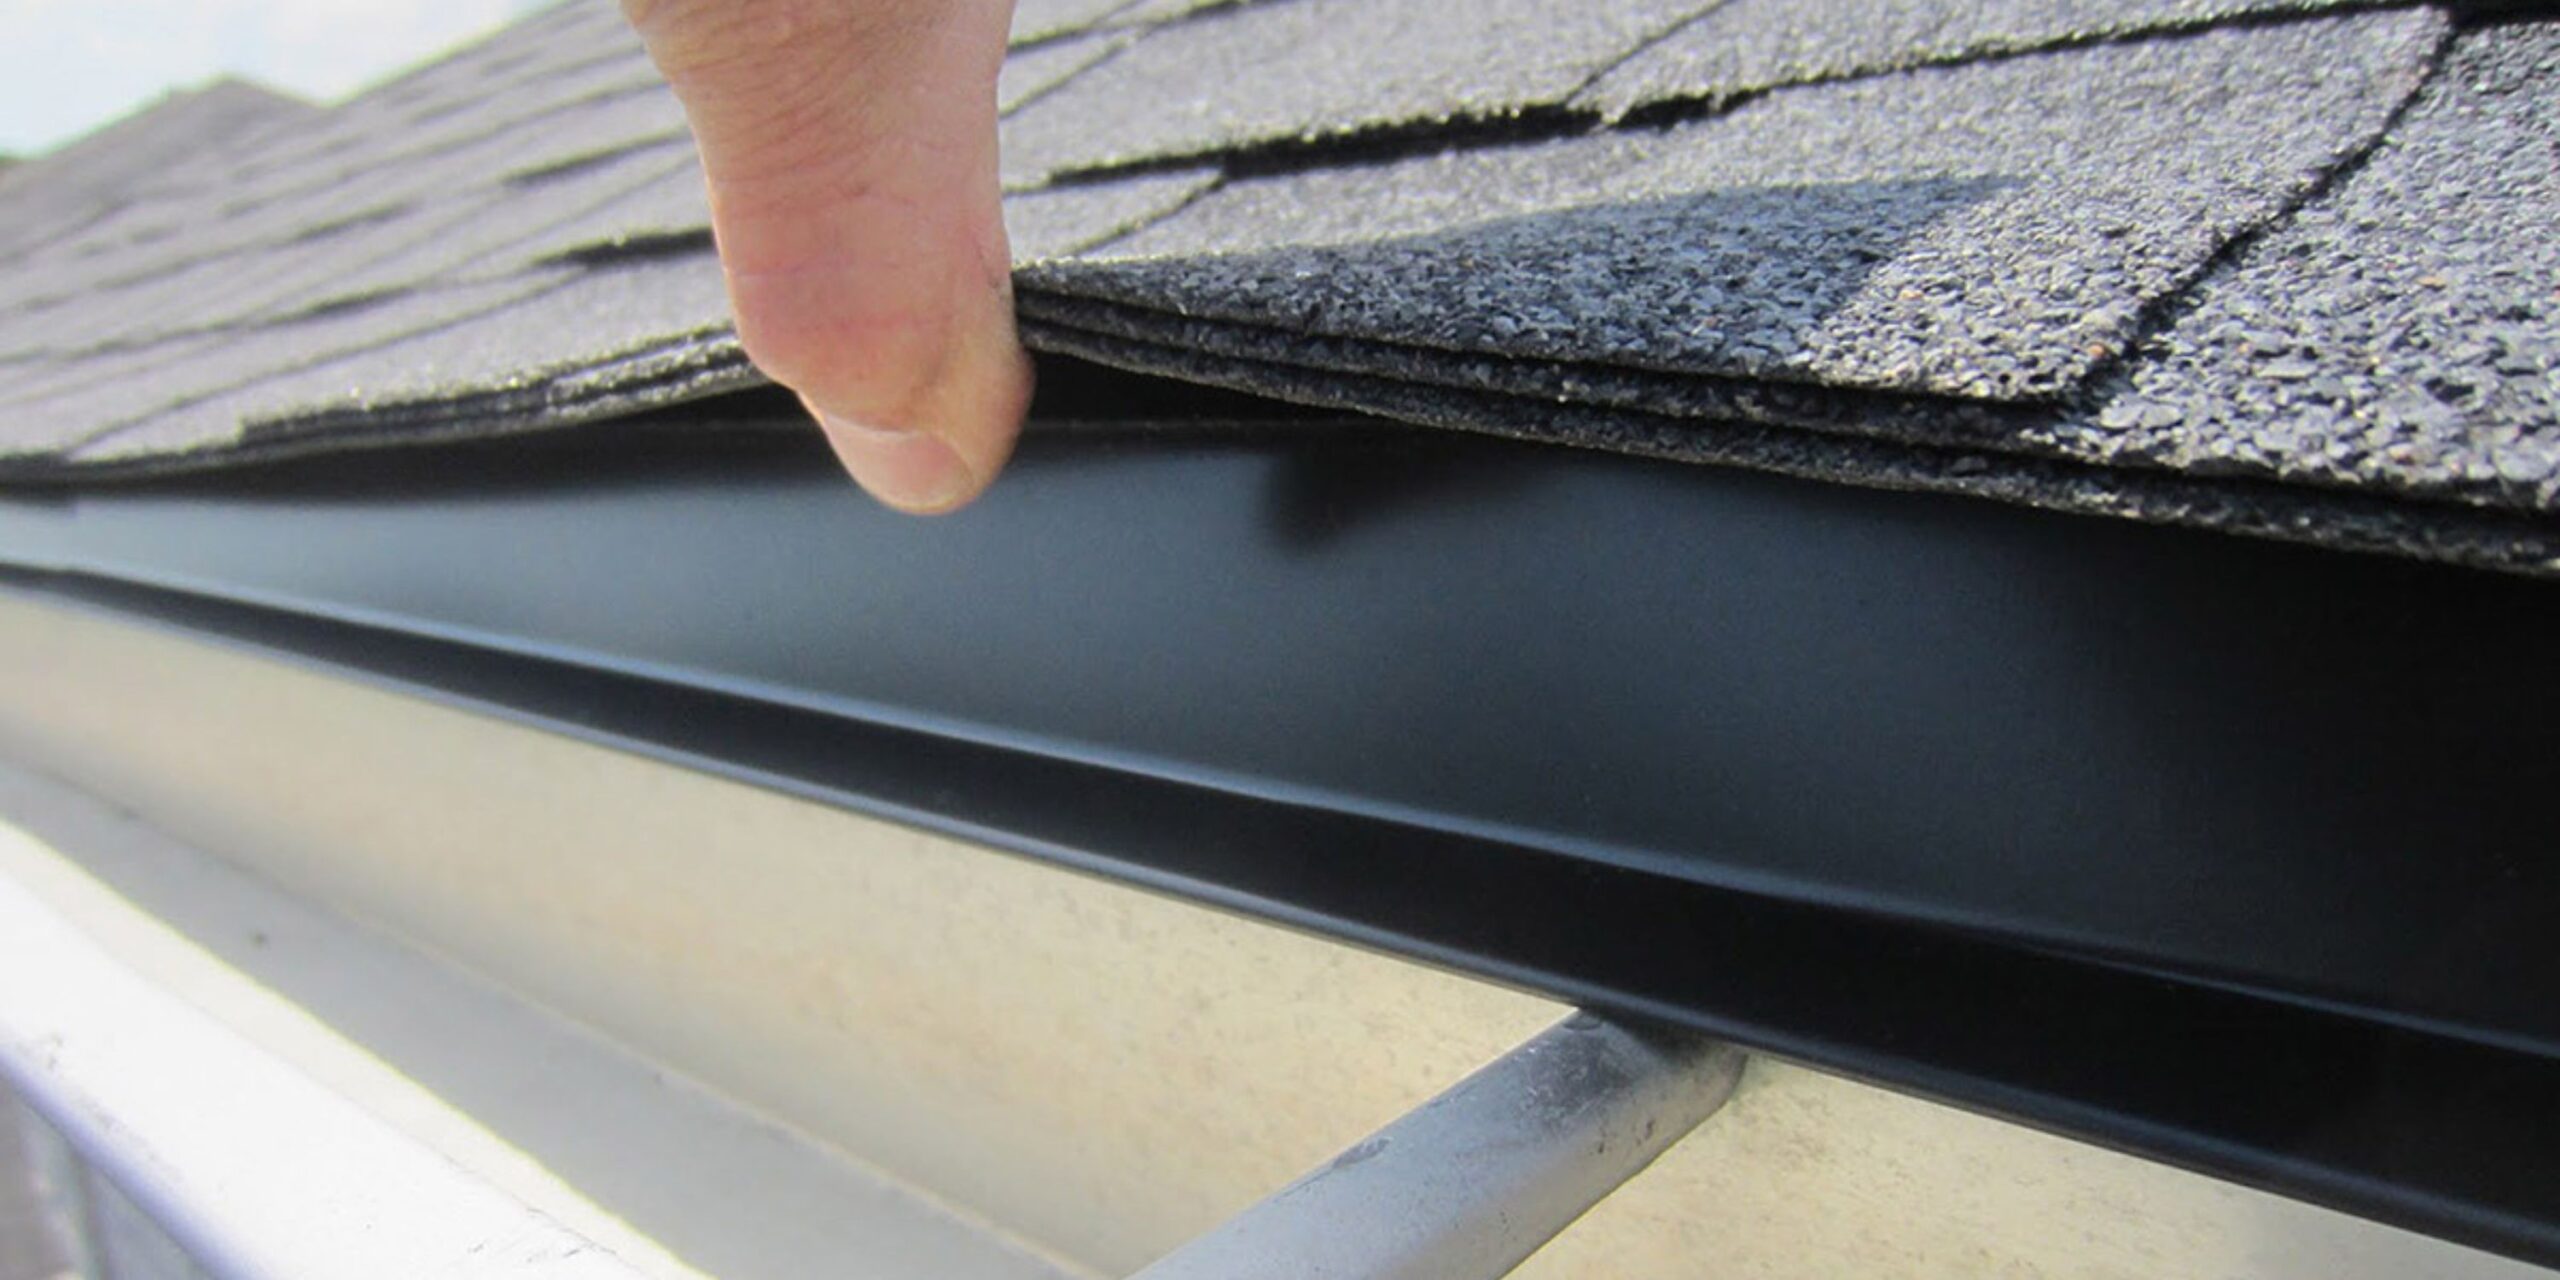
Roof flashing is a thin material, usually galvanized steel, that professional roofers use to direct water away from critical areas of the roof, wherever the roof plane meets a vertical surface like a wall or a dormer. Flashing is typically installed under shingles, not over them, to surround roof features, such as vents, chimneys and skylights. The main purpose of flashing is to ensure water runs down the side of the flashing and is directed to the shingles instead of finding its way into the roof deck.
If there were no flashing against these walls, water could slowly drip into the crevice between the wall and the roof and potentially into the home.
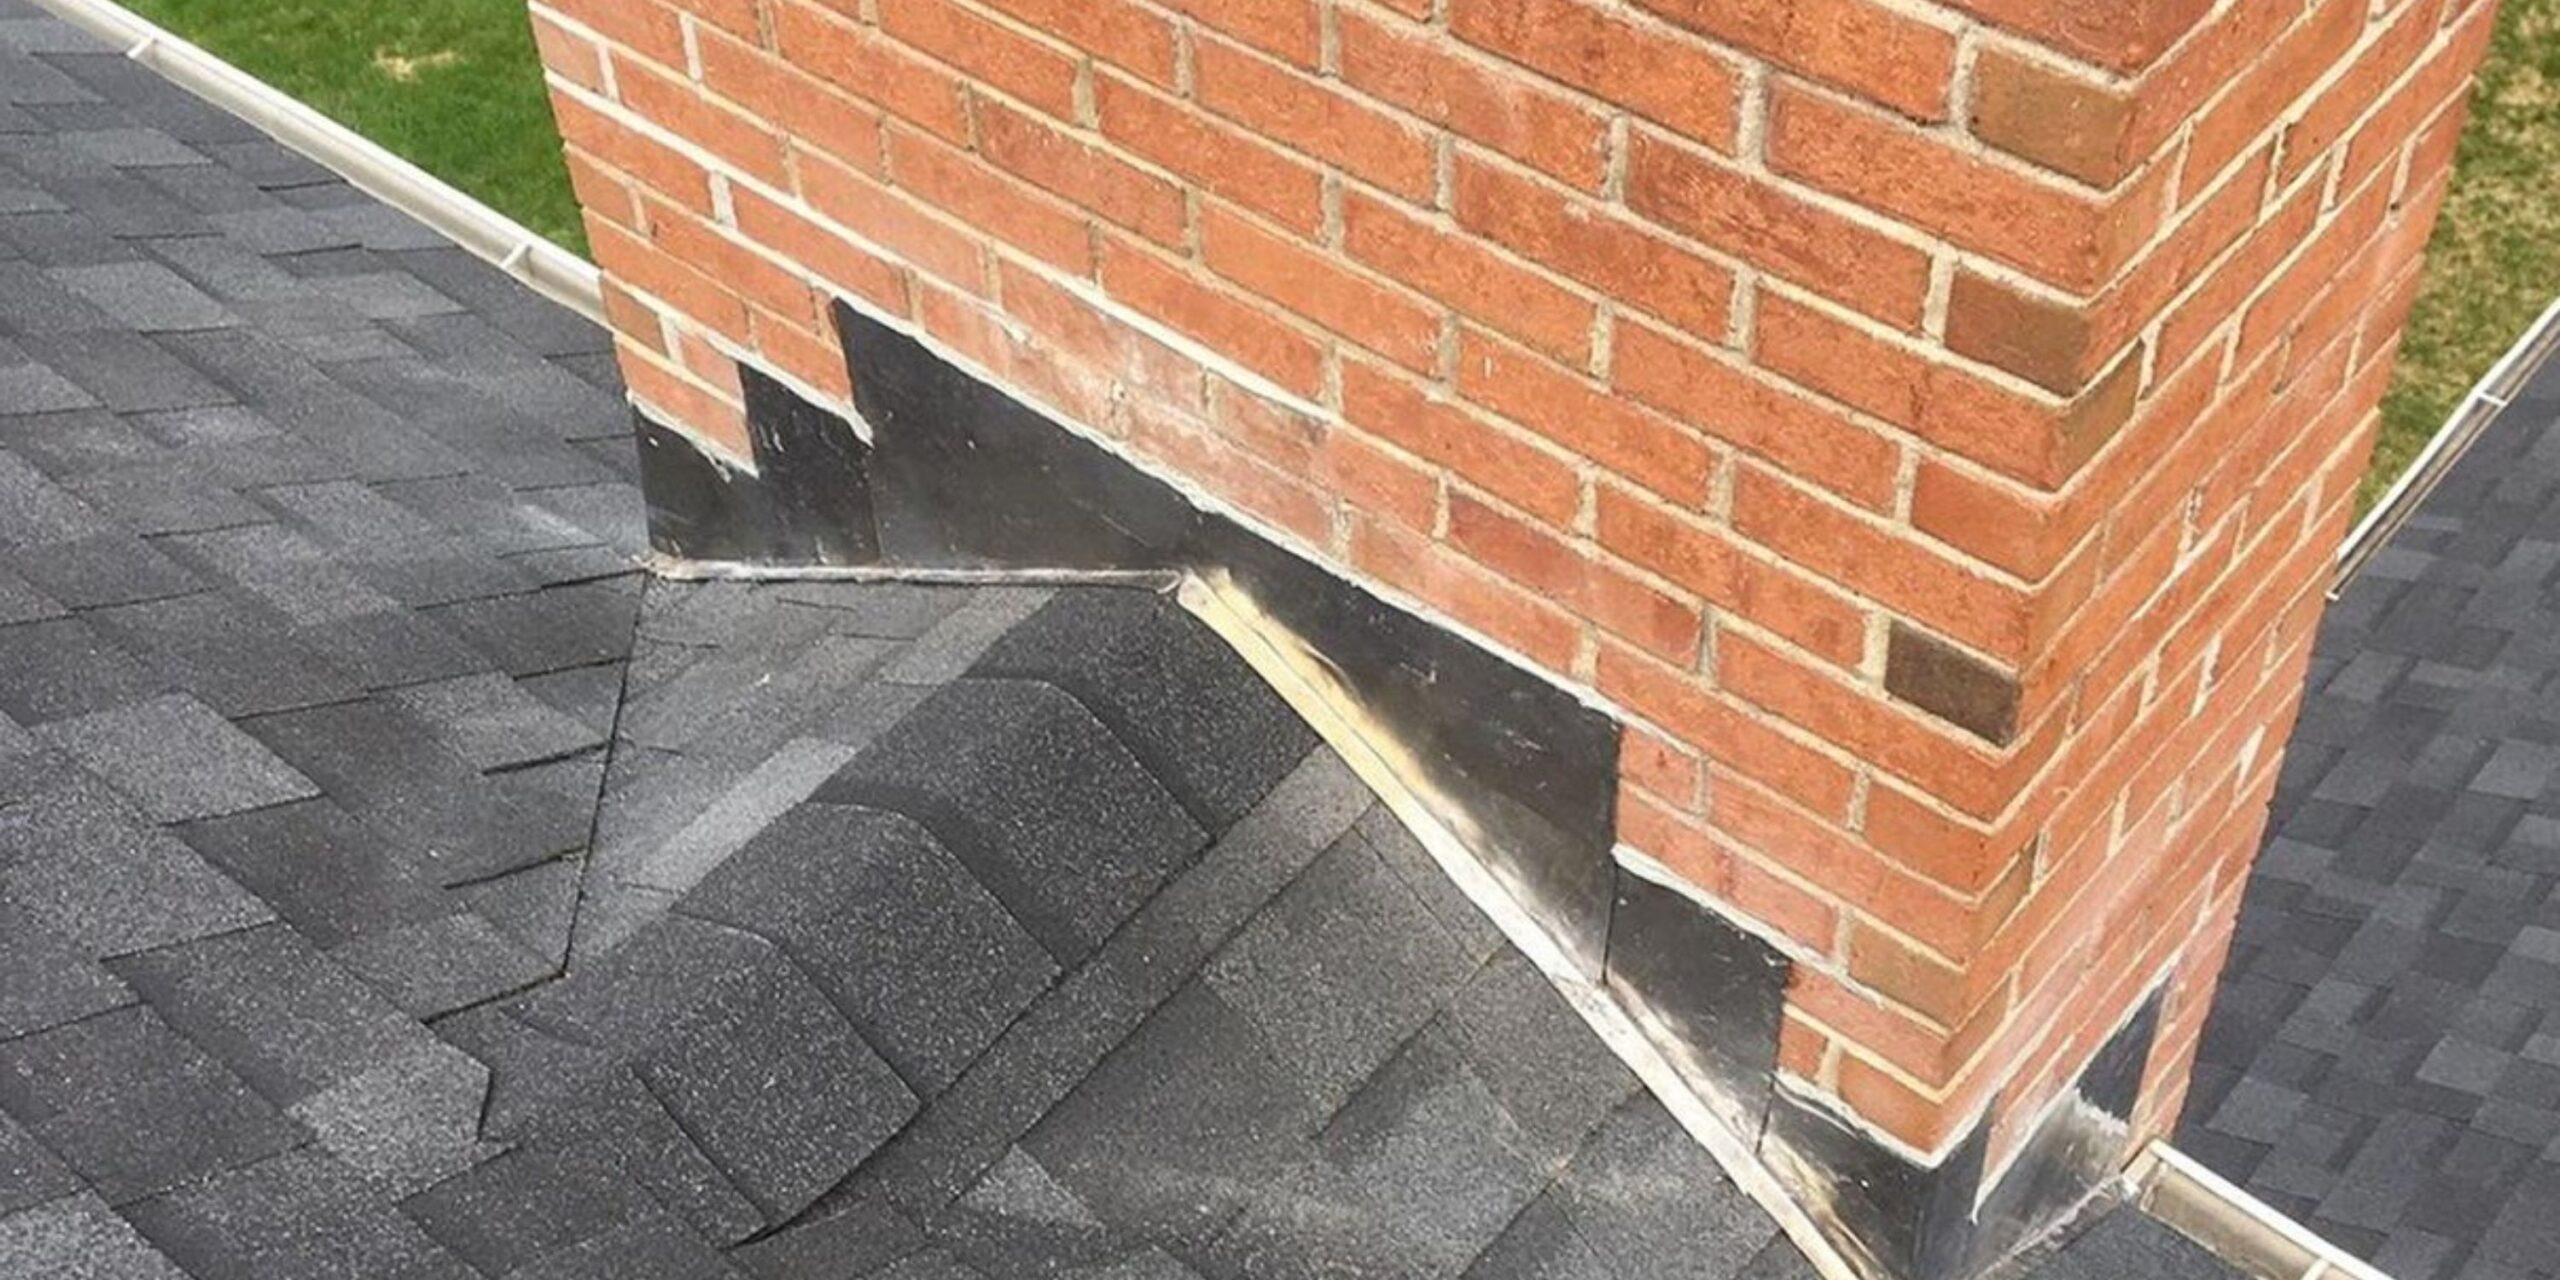
Damaged or improperly installed roof flashing, especially around the chimney, roof cricket or dormer, is one of the most common causes of roof leaks. Improper roof flashing could lead to wood rot and even deck collapse. So, chances are, if you’ve been looking into your roof and its flashing, you have questions. What is roof flashing? How do you install roof flashing? What about repairing roof flashing? You can find out here.
Types of Roof Flashing
There are almost as many types of roof flashing as there are parts of the roof! After all, each roof feature needs protection. These are the key types of roof flashing you need to understand:
- Continuous Flashing: Continuous flashing is also called “apron flashing” because it acts a lot like an apron. It’s a long, single piece of metal that carries water down to the shingles below. Long pieces of continuous flashing will have trouble flexing as the home expands and contracts in the changing seasons. If left as is, it could break or warp and fail to keep water out. Therefore, long pieces have built-in expansion joints so they can move with the home.
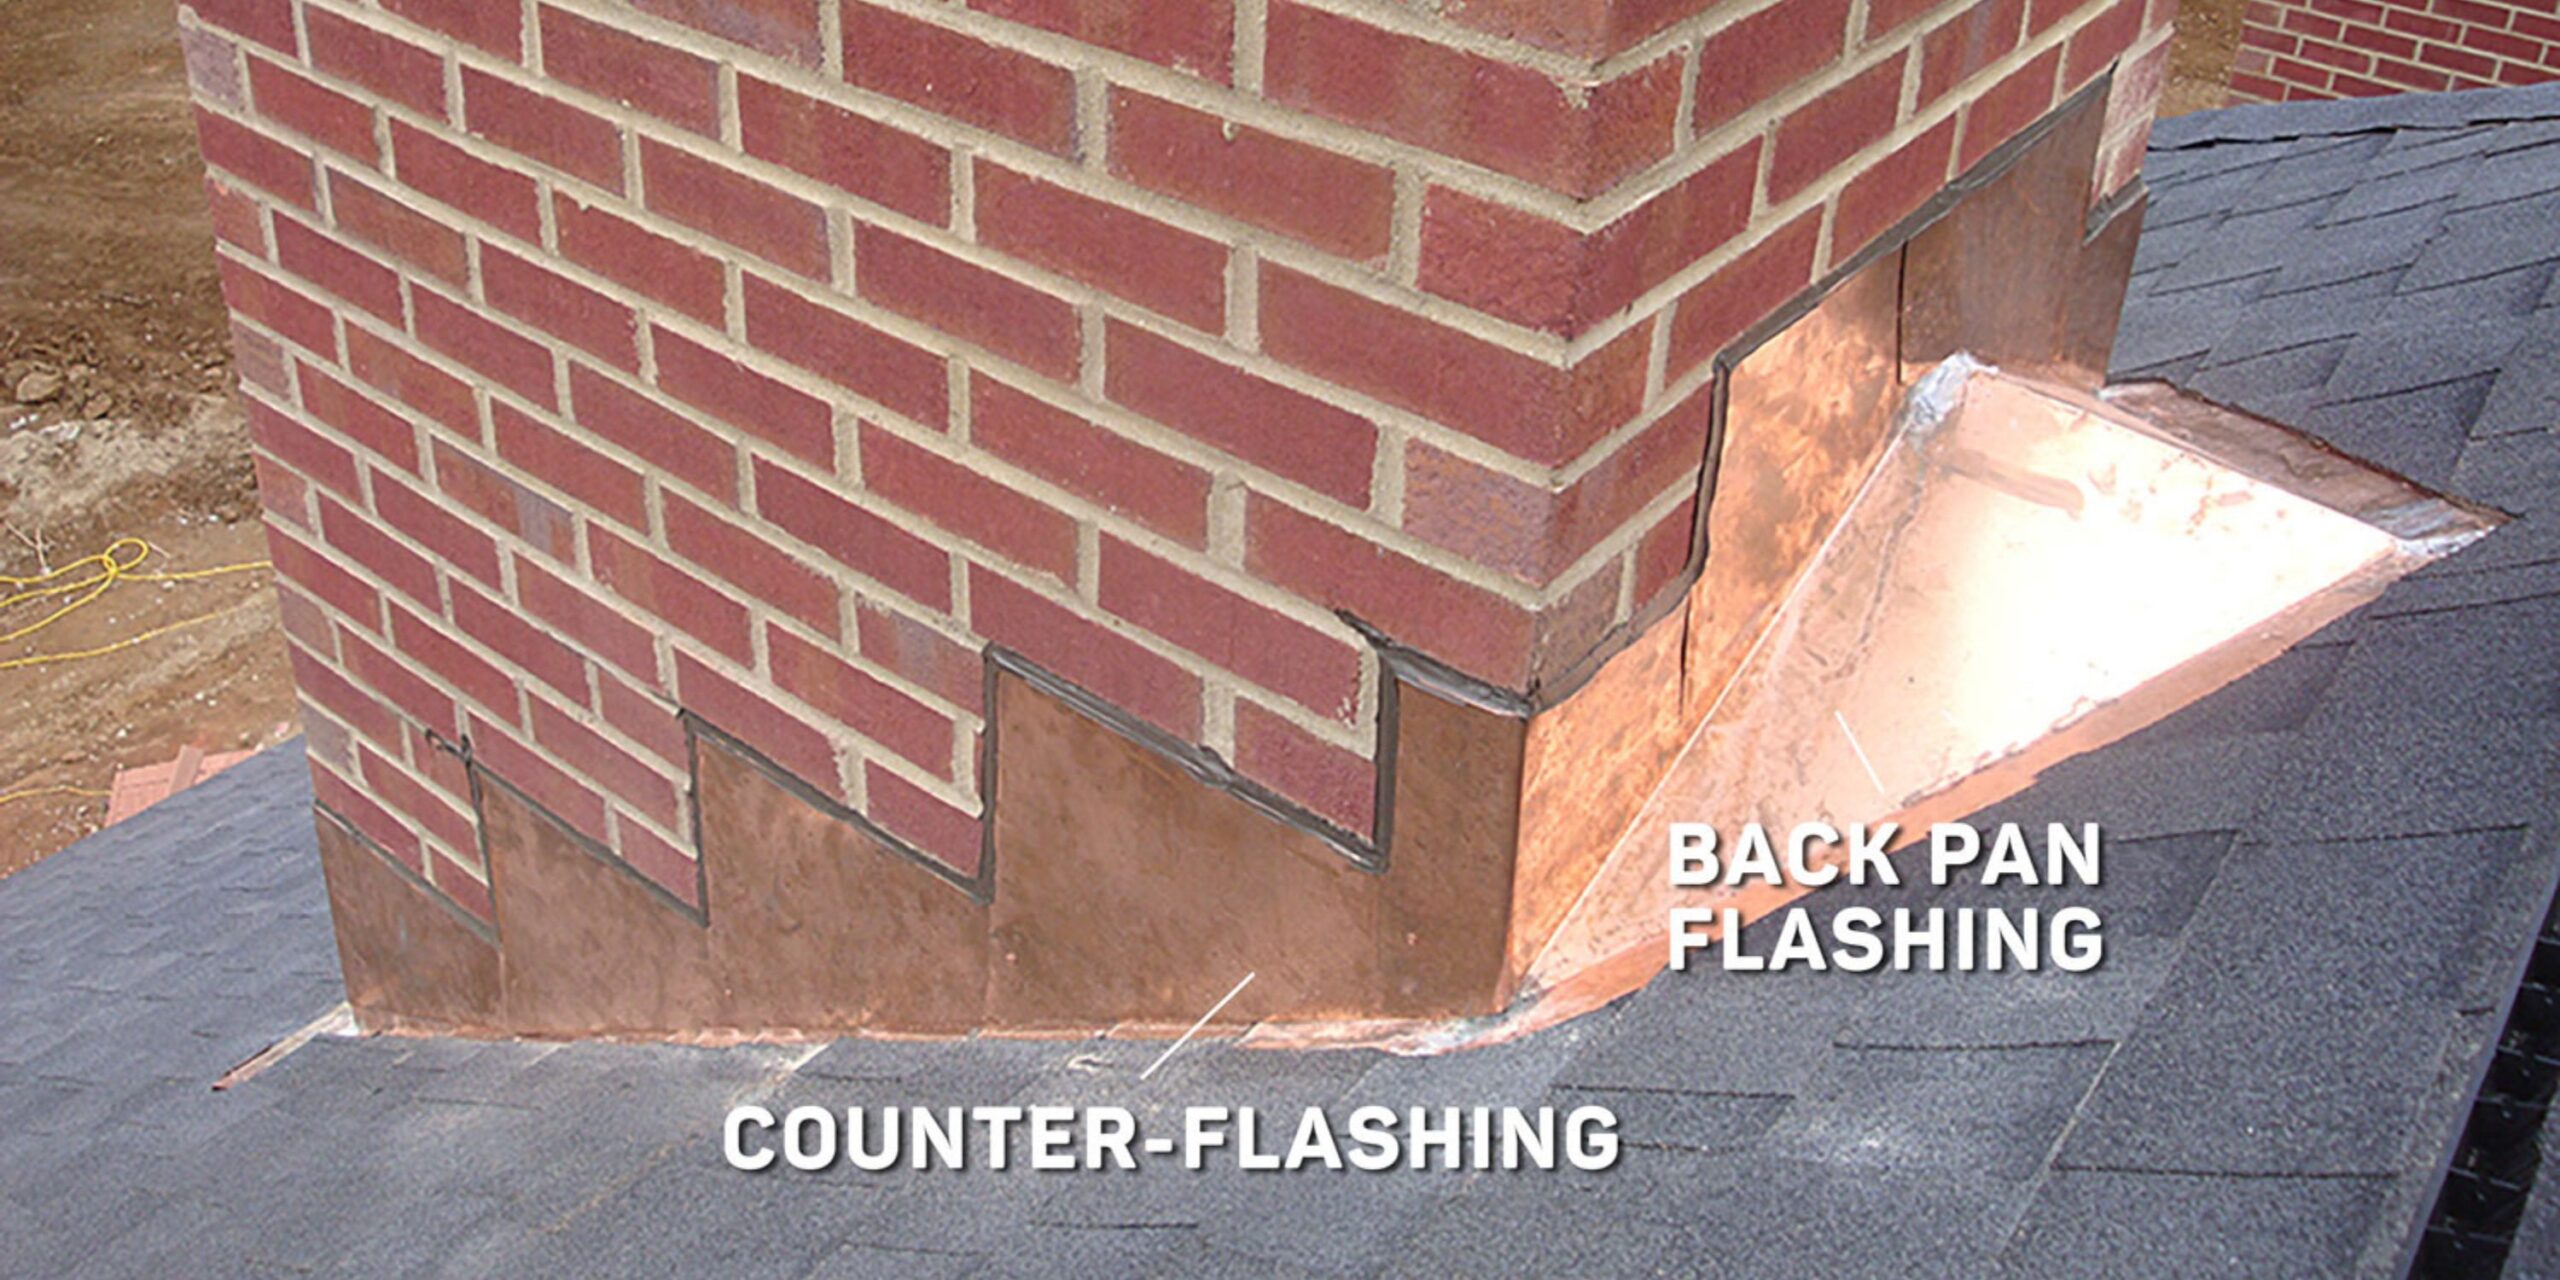
- Base Flashing: Some roof features, such as chimneys, require two pieces of flashing. This ensures that rain always meets a flashing surface that directs it downwards. Plus, it is notoriously tough to install flashing around a chimney. There is another benefit to two-part flashing: When the roof materials naturally expand and contract with weather changes, the two pieces can move, so the whole system stays secure. The base flashing (or apron flashing) is the bottom piece.
- Counter-Flashing: Placed opposite to base flashing, or above base flashing, counter-flashing completes the two-part team.
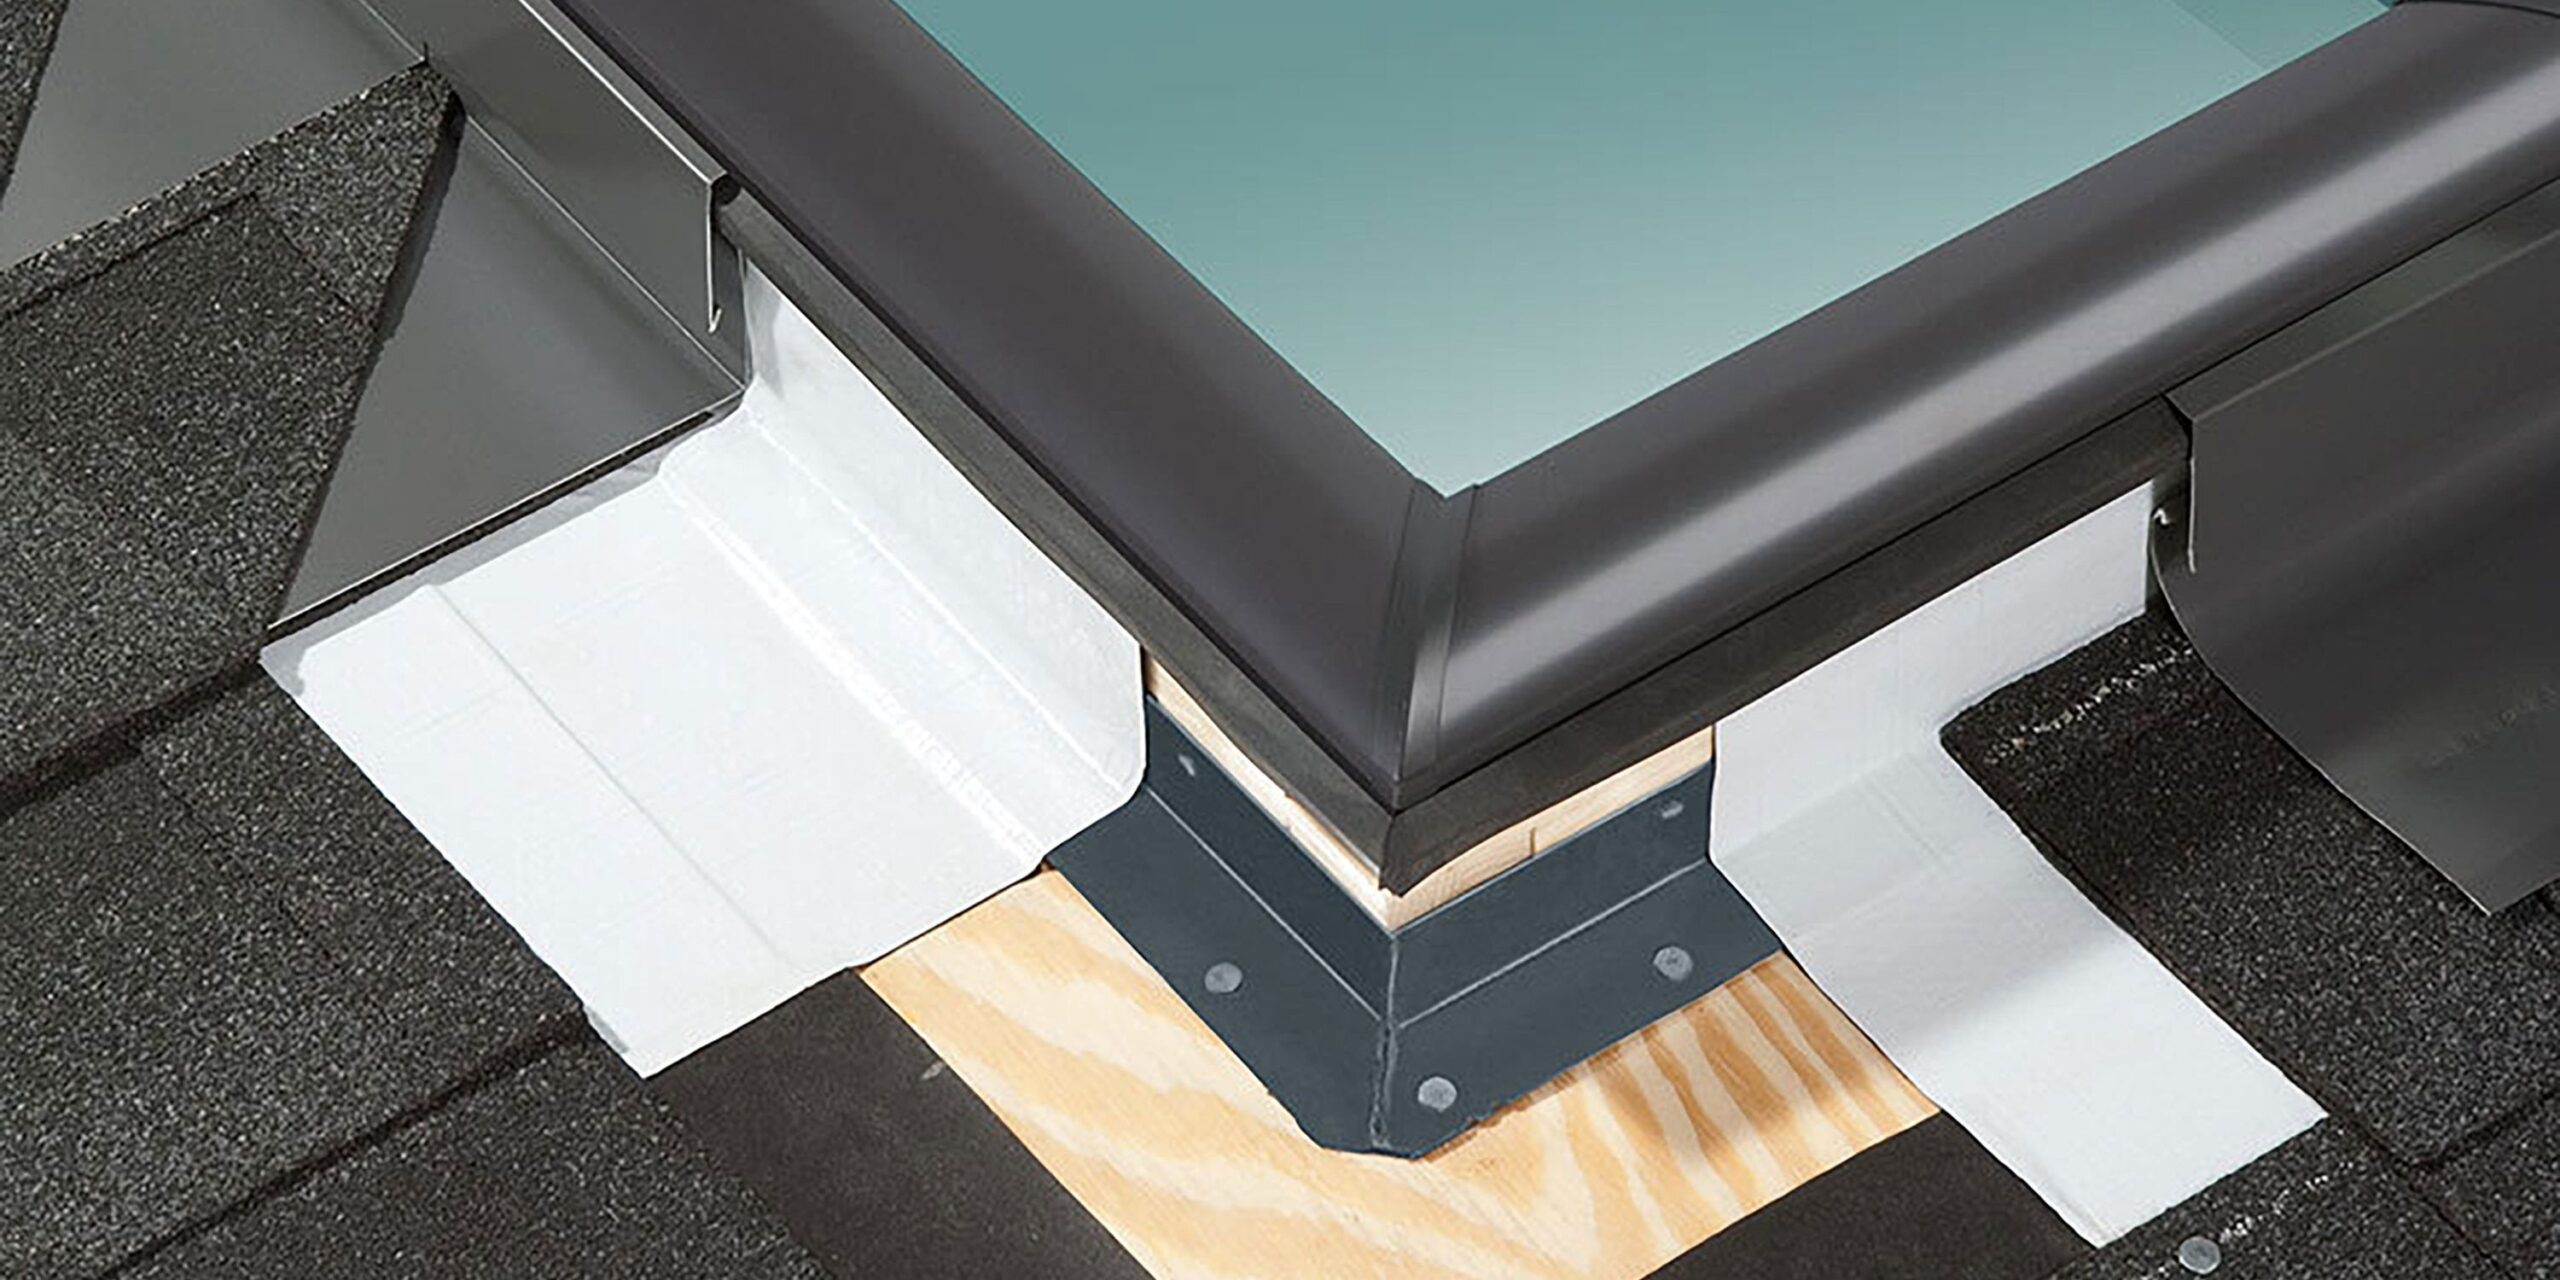
- Step Flashing: Step flashing is a rectangular piece of flashing bent 90 degrees in the center. It is used for roof to wall flashing. Multiple pieces of the flashing will be installed in layers with shingles to ensure the water flows away from the wall. Learn how to install it below.
- Skylight flashing: While some skylight manufacturers include flashing in their products, sometimes roofing professionals have to create it or purchase it separately.
- Valley flashing: Open valleys have metal flashing to protect this critical area of the roof.
- Drip edges: The edge of the roof has thin metal flashing that helps water drip off the roof without damaging the home or causing a leak.
- Kickout flashing: Roofing professionals need something to bridge the gap between where step flashing ends and the gutter begins. Kickout flashing directs water away from the wall and into the gutter. Learn how to install kickout flashing below.
While there are premade flashing pieces you can purchase, many roofing professionals cut their own roof flashing from sheet metal. They use tinning snips to cut the sheets and bend them to the exact size they need while on the roof. However, if you walk into a store to buy your own flashing, be careful. There are other types of premade flashing that are not made to be used on roofs and may break if you try to install them on a roof. For example, head flashing or cap flashing protects doors and windows from water.
Roof Flashing Sizes
If you intend to install or repair roof flashing, then you’ll need to pay attention to size. The flashing for your plumbing vent needs to be large enough to surround the vent, so it should be just wider than the vent’s diameter.
The minimum dimensions of step flashing pieces are 10 inches (254 mm) long and at least 2 inches (50 mm) wider than the exposure of the shingle you’re using. For example, 3-tab shingles usually have a 5 5/8-inch (143 mm) exposure. Typically, 10- by 8-inch (253 mm x 203 mm) flashing is chosen. Those 8 inches are more than enough to cover the exposure of typical shingles. The same size can be used to cover the longer exposure on Cambridge™ shingles.
However, if you were using IKO’s Crowne Slate™, with a 10-inch (254 mm) exposure, you’d need a 10- by 12-inch (254 mm x 304 mm) step flashing piece.
Roof Flashing Materials
In the past, roofing professionals would use lead, or lead-coated materials, as flashing. Roofing professionals in North America now prefer other materials with steel being the best material for roof flashing:
- Steel: Steel is usually the material of choice for flashing. It’s malleable, has aesthetic value and, when galvanized, is corrosion-resistant.
- Aluminum: Aluminum flashing is easy for roofing professionals to form and is lightweight. However, aluminum must be coated if it is to be used with concrete and masonry, as plain aluminum reacts and degrades when it touches alkaline surfaces. In coastal areas, aluminum flashing should be coated even if it does not contact concrete or masonry, to prevent corrosion.
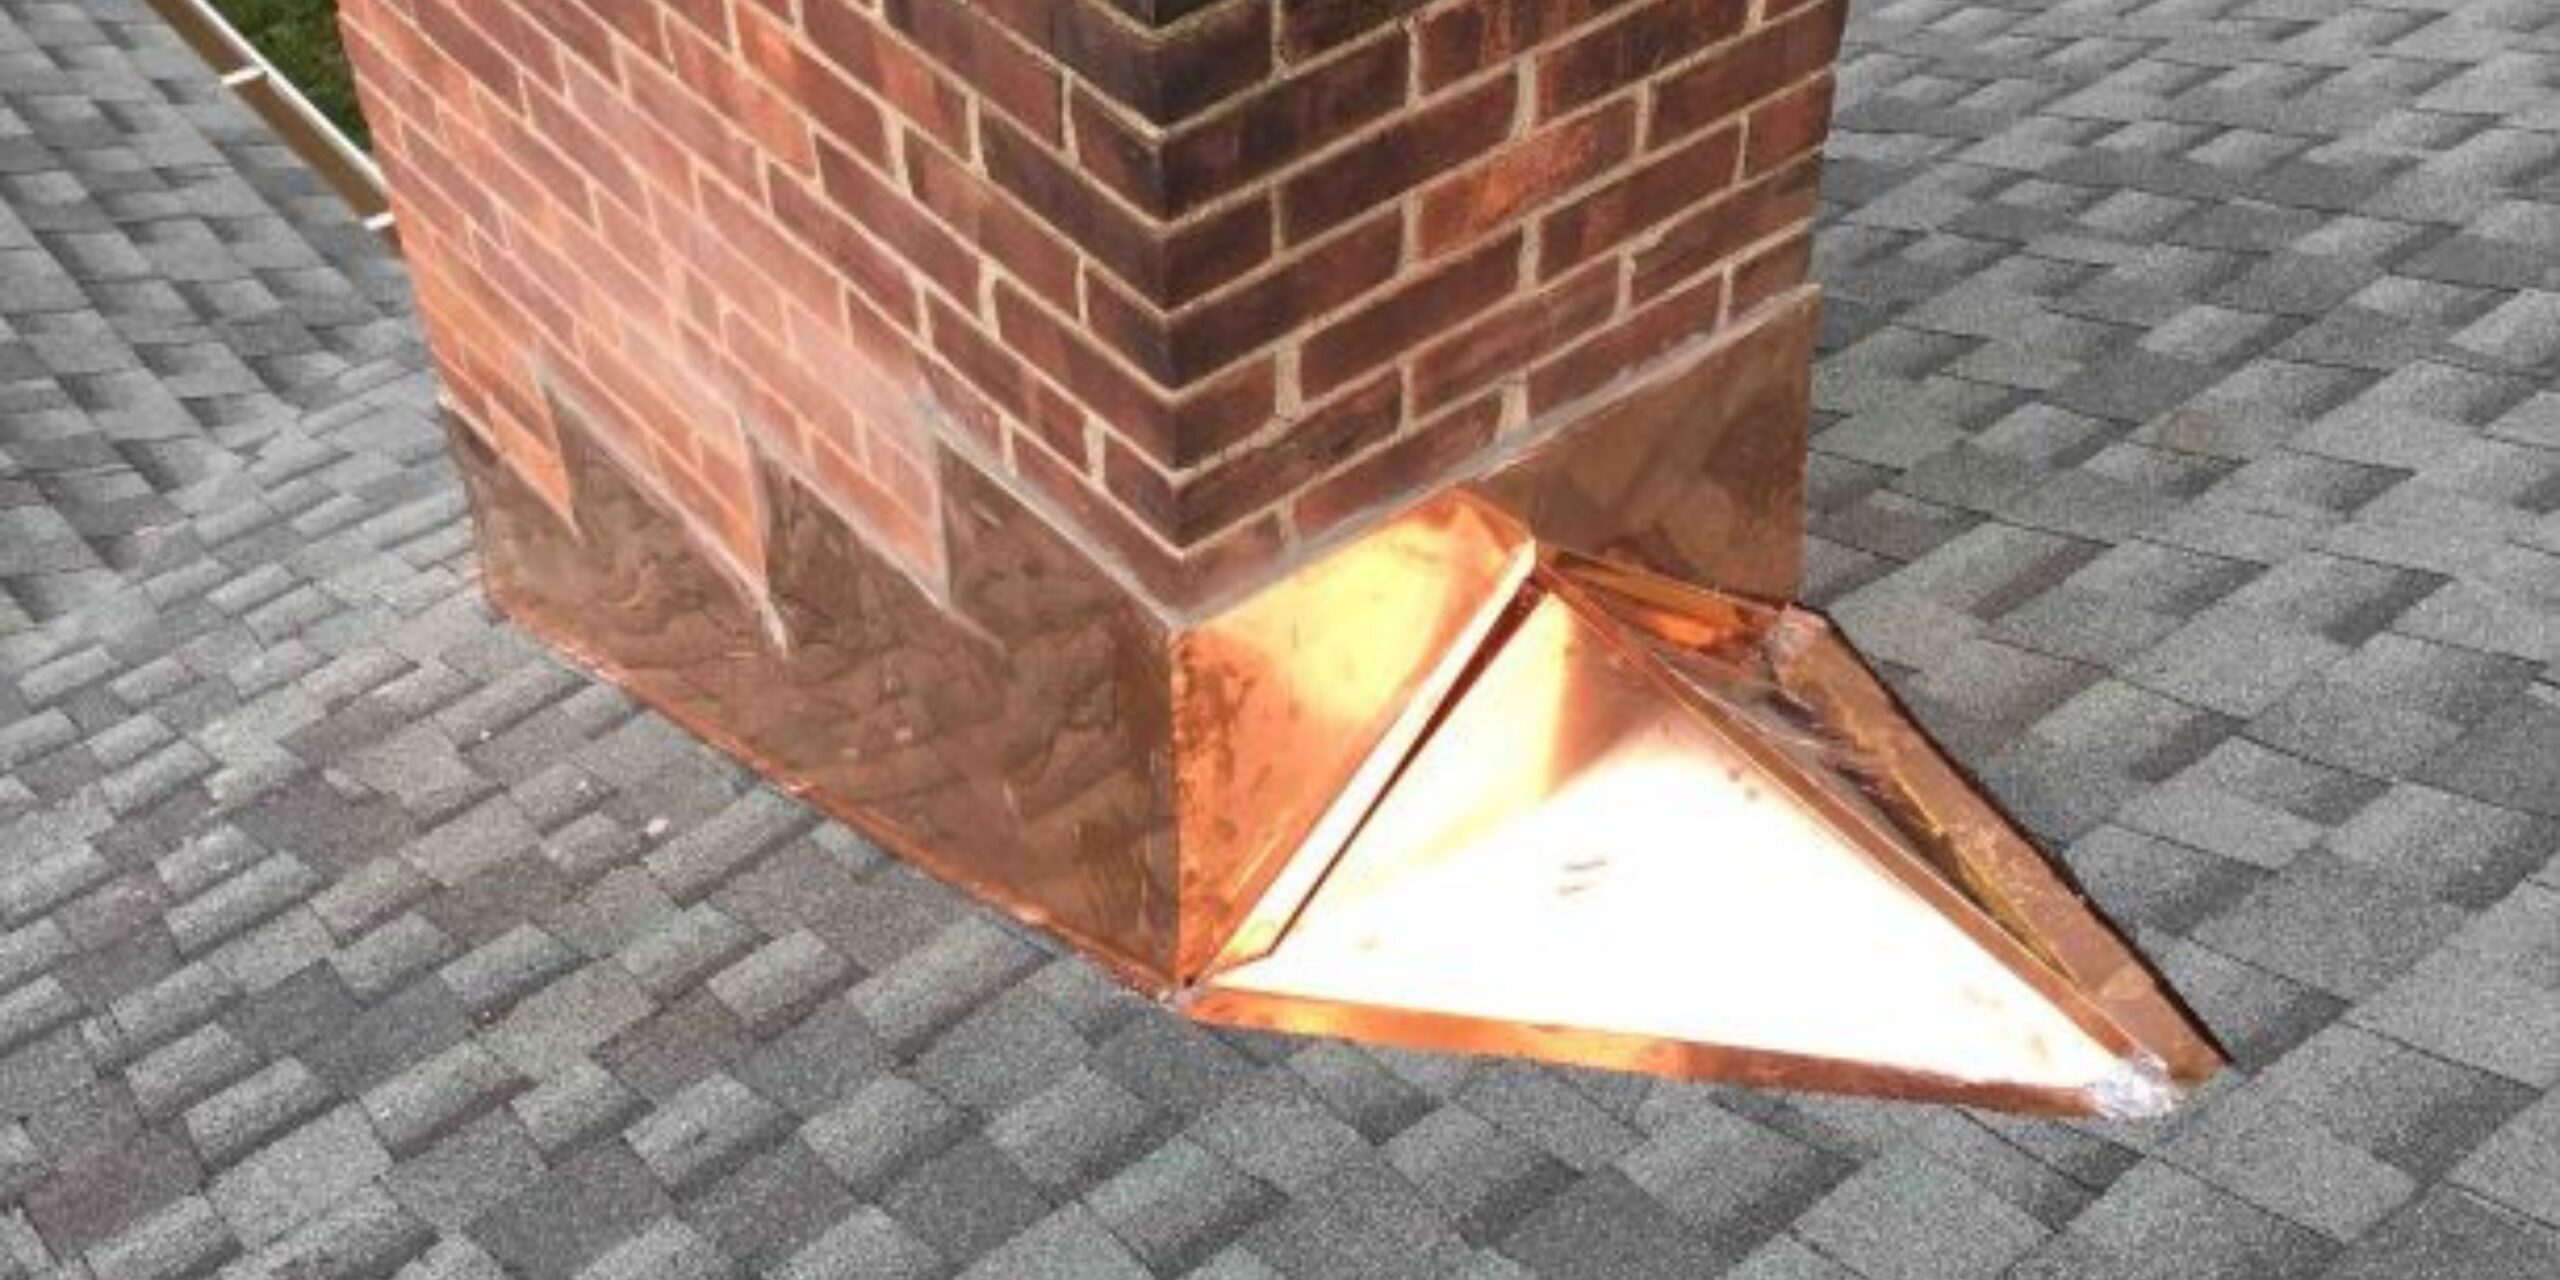
- Copper: Copper roof flashing is also malleable and takes soldering well. It’s also highly durable and has a long life. On the other hand, it does discolor into a patina, which some homeowners dislike, but others favor. You will still routinely find copper flashing around chimneys.
Building codes may demand your roofing professional use a specific material for flashing. They may also list a minimum thickness. Most building codes require 26-gauge galvanized steel as a minimum. You should always check your local codes to be sure you’re following them.
In fact, if you live in Florida, you may find that your building codes call for a special flashing material, modified bitumen roofing tape:
- Modified bitumen roofing tape: Modified bitumen is a watertight, tough material. When made into a tape, it can be used to aid roof flashing. The specific tape you use will have to be approved by your building code and of a certain width.
Roof Flashing Sealant Types
When installing roof flashing, you will need to use a sealant. While roofing professionals occasionally use nails when flashing, they must choose whether to nail to the roof plane or the vertical wall. If nailed to both, the flashing may deform under the pressure from shifting brick or wood. When nailed only to the roof plane or vertical wall, the flashing can stay in place while the other building materials expand and contract throughout the seasons.
Roofing cement: Roofing cement creates a waterproof seal. Roofing professionals usually apply it with a trowel.
Though roof flashing isn’t the most dramatic element of a roof, it is one of the most important. If you find some flashing on your roof that you’re concerned about, we suggest you find a professional roofer through IKO’s Contractor Locator. A professional can help you solve all of your roof flashing problems or answer the questions you have about your specific roof.